Git Branching
- Views
Git Branches in a Nutshell
Branches in a Nutshell
What does Git do when you make a commit? Git stores a commit object that contains a pointer to the snapshot of the content you staged.
This commit object contains the author’s name and email, the message that you typed and pointers to the commit or commits that directly came before this commit.
Let’s take an example:
$ git add REAME.md FAQ.md LICENSE
$ git commit -m "The initial commit of my project"
After running git commit, Git checksums each subdirectory and stores those tree objects in the Git repository. Now your Git repository has 5 objects: one blob for each of your 3 files, one tree that lists the contents of the directory and specifies which file names are stored as which blob, and one commit with the pointer to that root tree and all the commit metadata.
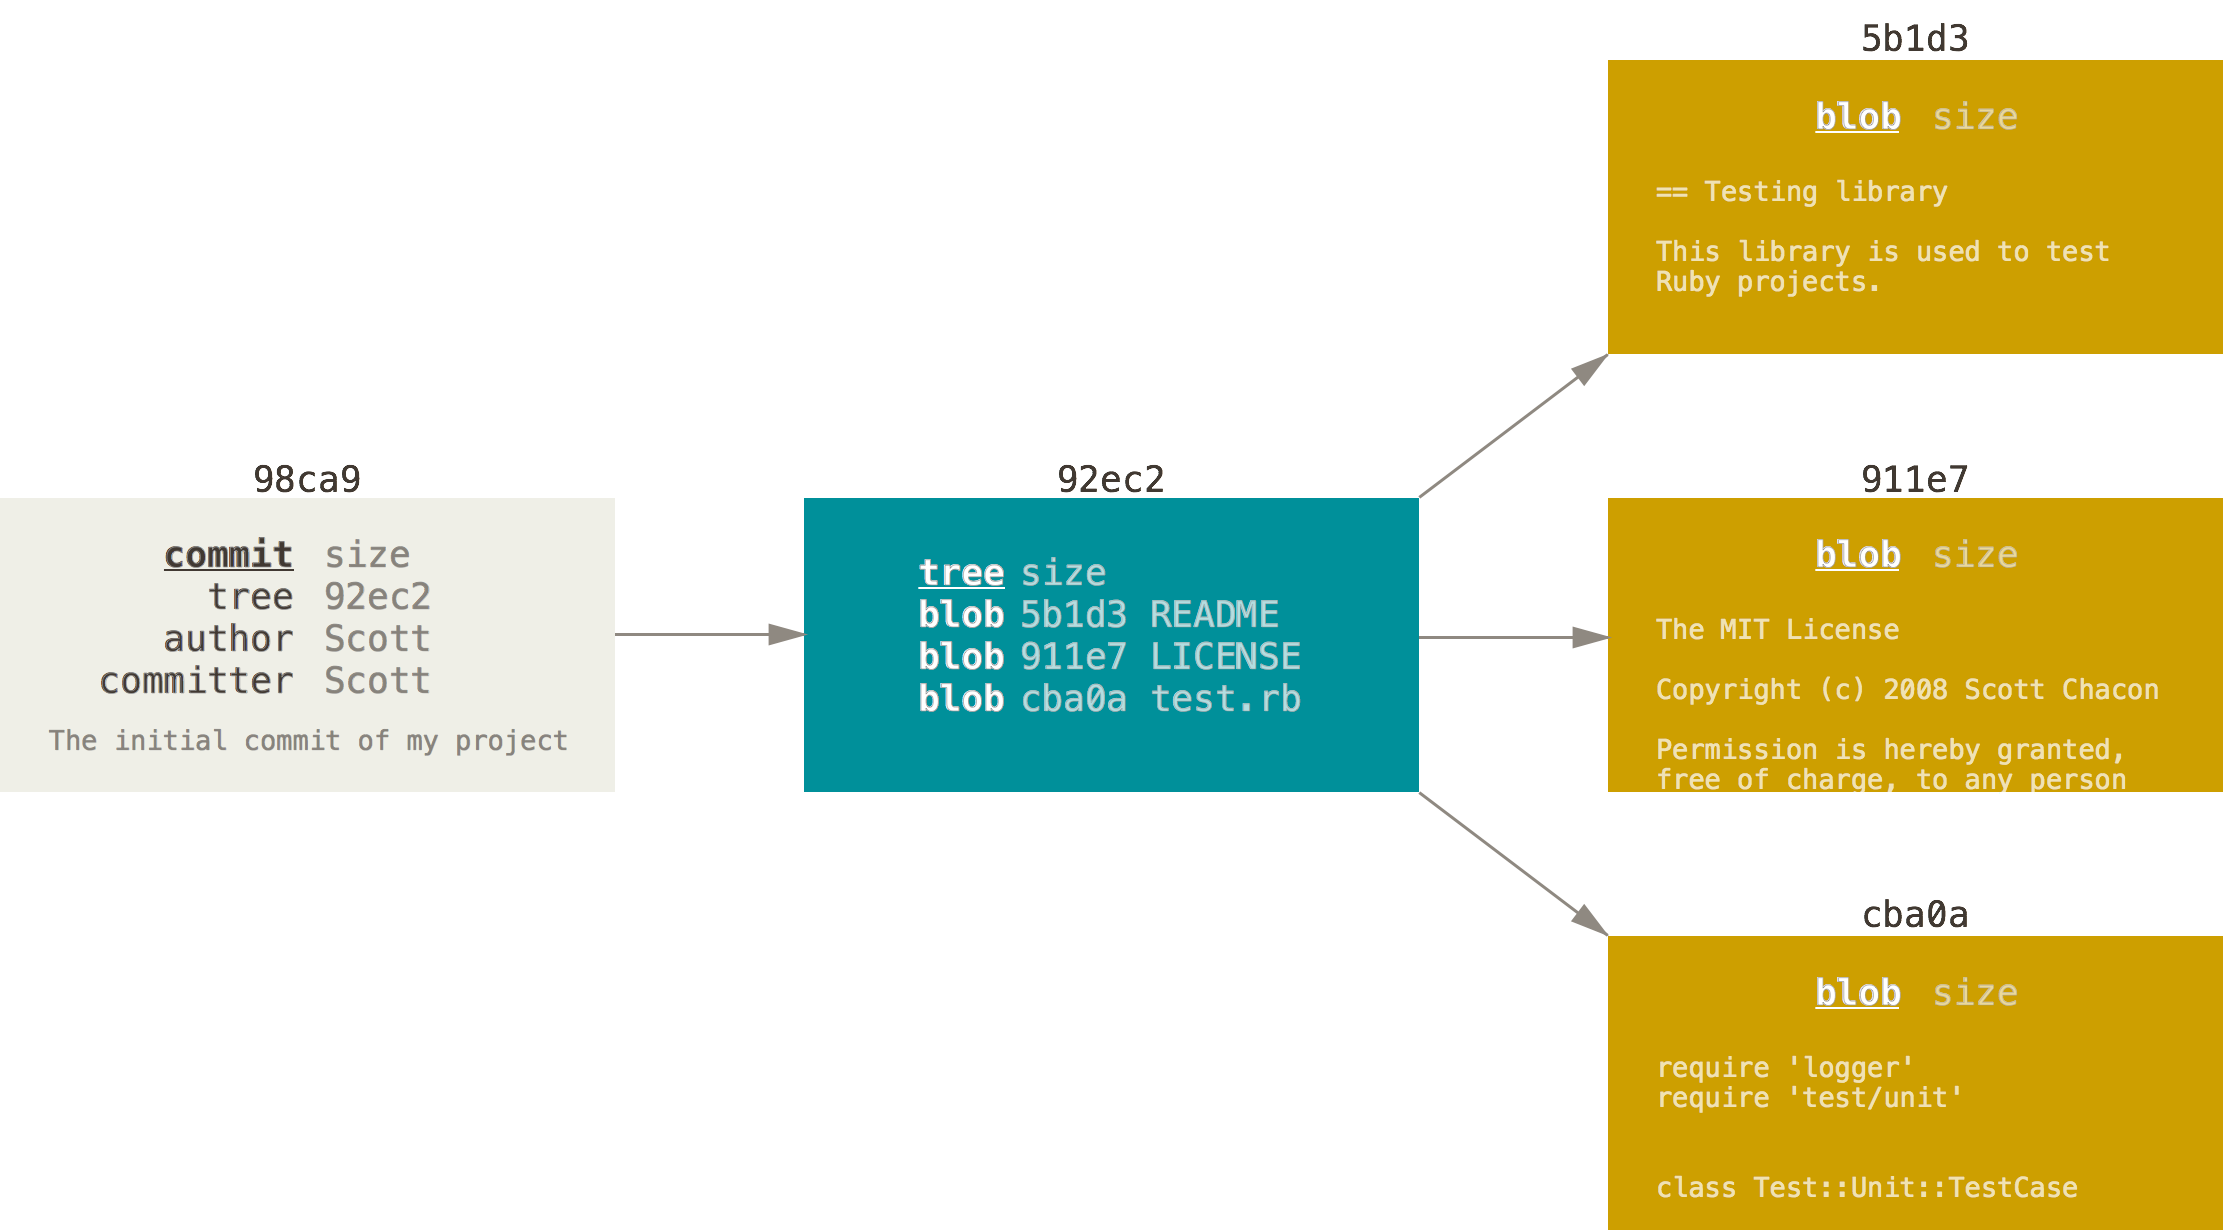
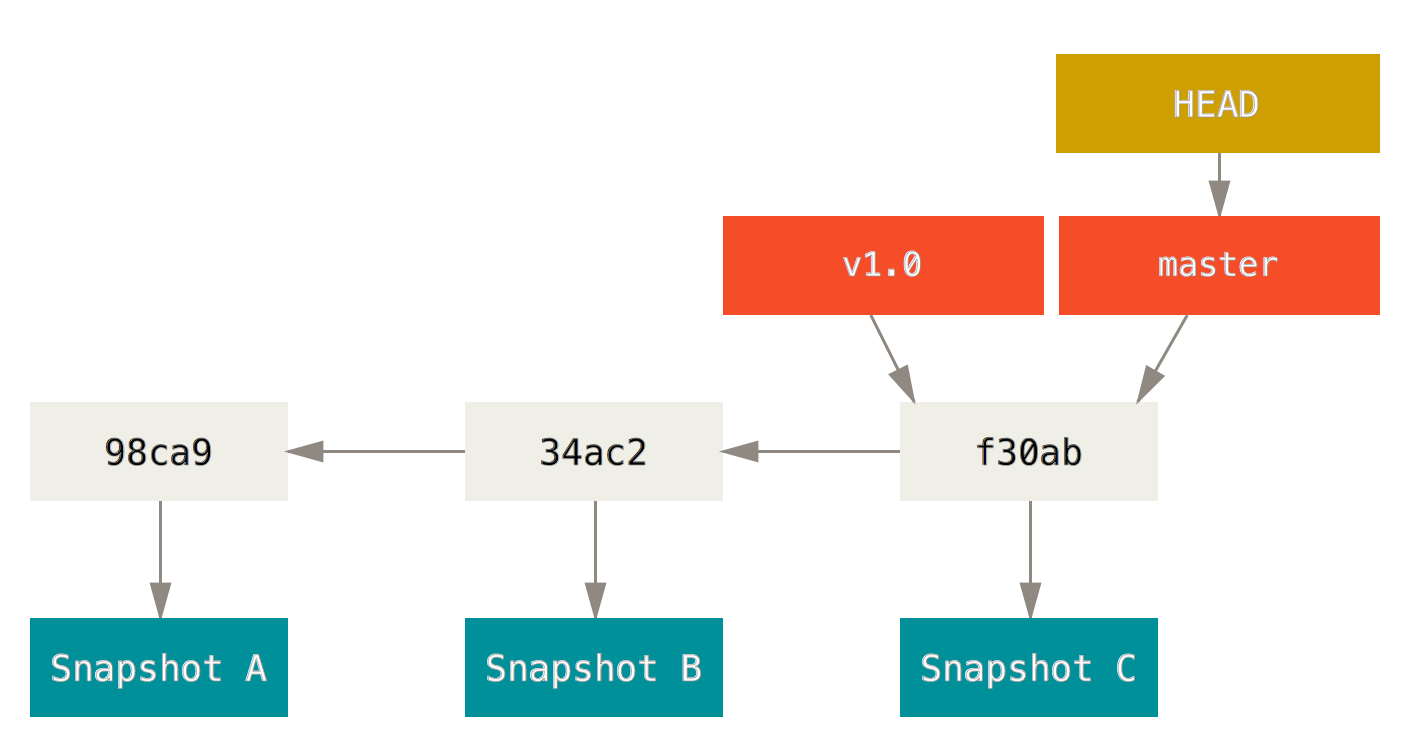
If you make some changes and commit again, the next commit stores a pointer to the commit that came immediately before it.

A branch in Git is simply a lightweight movable pointer to one of these commits. The default branch name is master. Every time you commit, it moves forward automatically.
Creating a New Branch
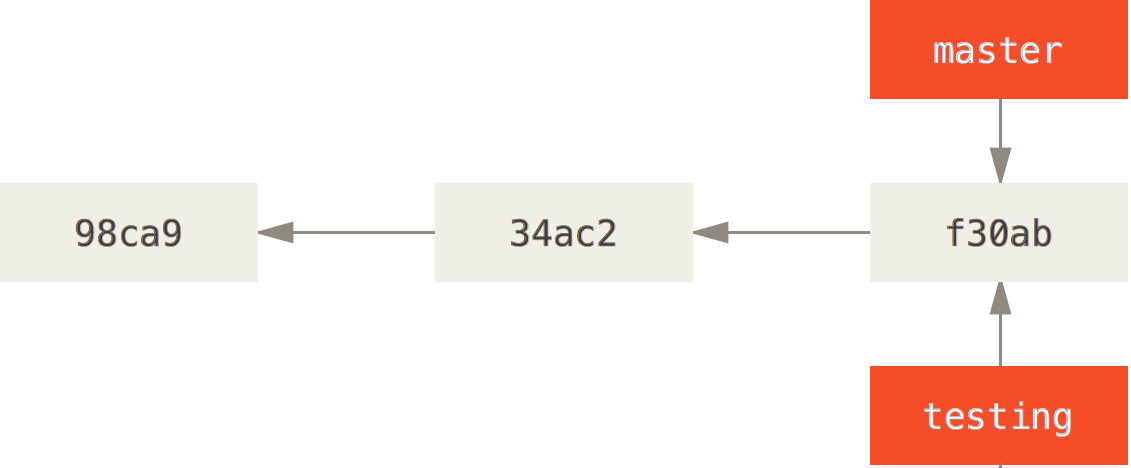
What happens if you create a new branch? Well, doing so creates a new pointer for you to move around. Let’s say you create a new branch called testing. You do this with the git branch command:
$ git branch testing
This creates a new pointer to the same commit you’re currently on.
How does Git know what branch you’re currently on? It keeps a special pointer called HEAD. Note that this is a lot different than the concept of HEAD in other VCSs you may be used to, such as Subversion or CVS. In Git, this is a pointer to the local branch you’re currently on. In this case, you’re still on master. The git branch command only created a new branch – it didn’t switch to that branch.
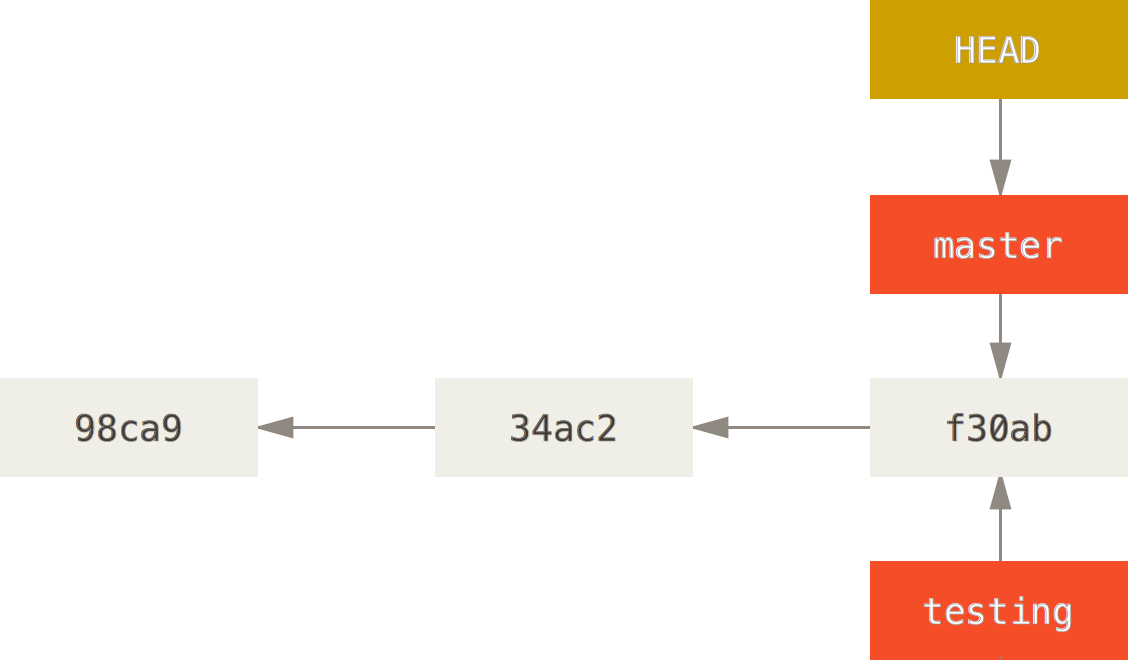
You can check which branch you are on by:
$ git log --oneline --decorate

or

$ git status

or

$ git branch
Switching Branches
To switch to the new testing branch:
$ git checkout testing
This moves HEAD to point to the testing branch.
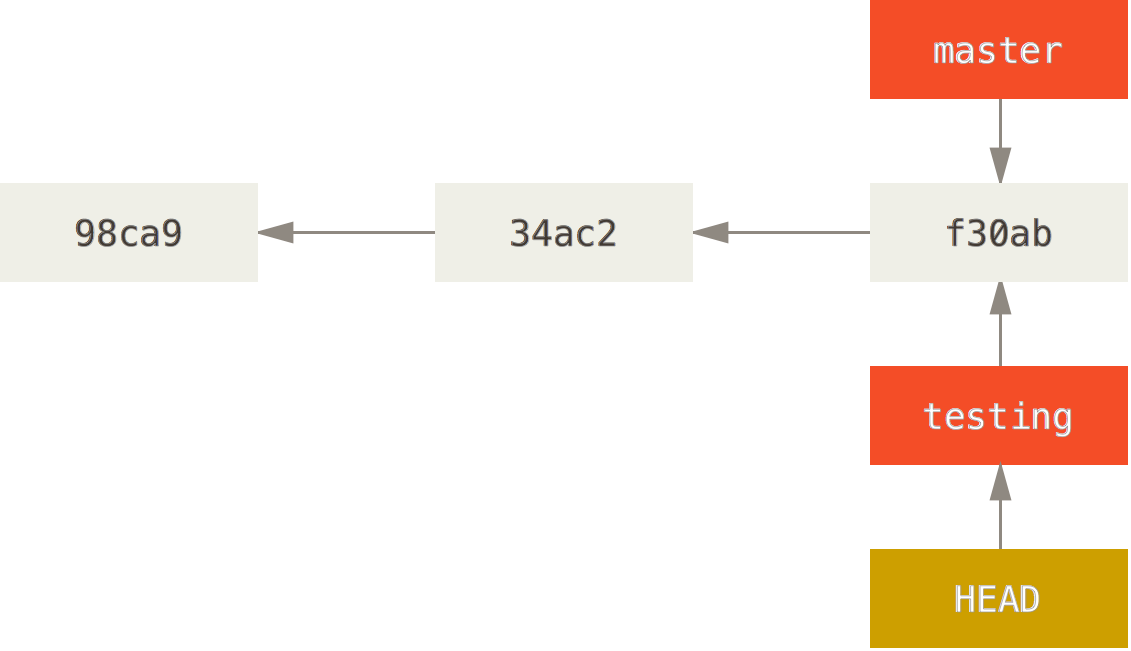
When you made some changes on testing branch and committed your changes and switch back to master branch:
$ git checkout master
That command did two things. It moved the HEAD pointer back to point to the master branch, and it reverted the files in your working directory back to the snapshot that master points to. This also means the changes you make from this point forward will diverge from an older version of the project. It essentially rewinds the work you’ve done in your testing branch so you can go in a different direction.
It’s important to note that when you switch branches in Git, files in your working directory will change. If you switch to an older branch, your working directory will be reverted to look like it did the last time you committed on that branch. If Git cannot do it cleanly, it will not let you switch at all.
When you keep switching and changing between the two branches, you project will diverge:
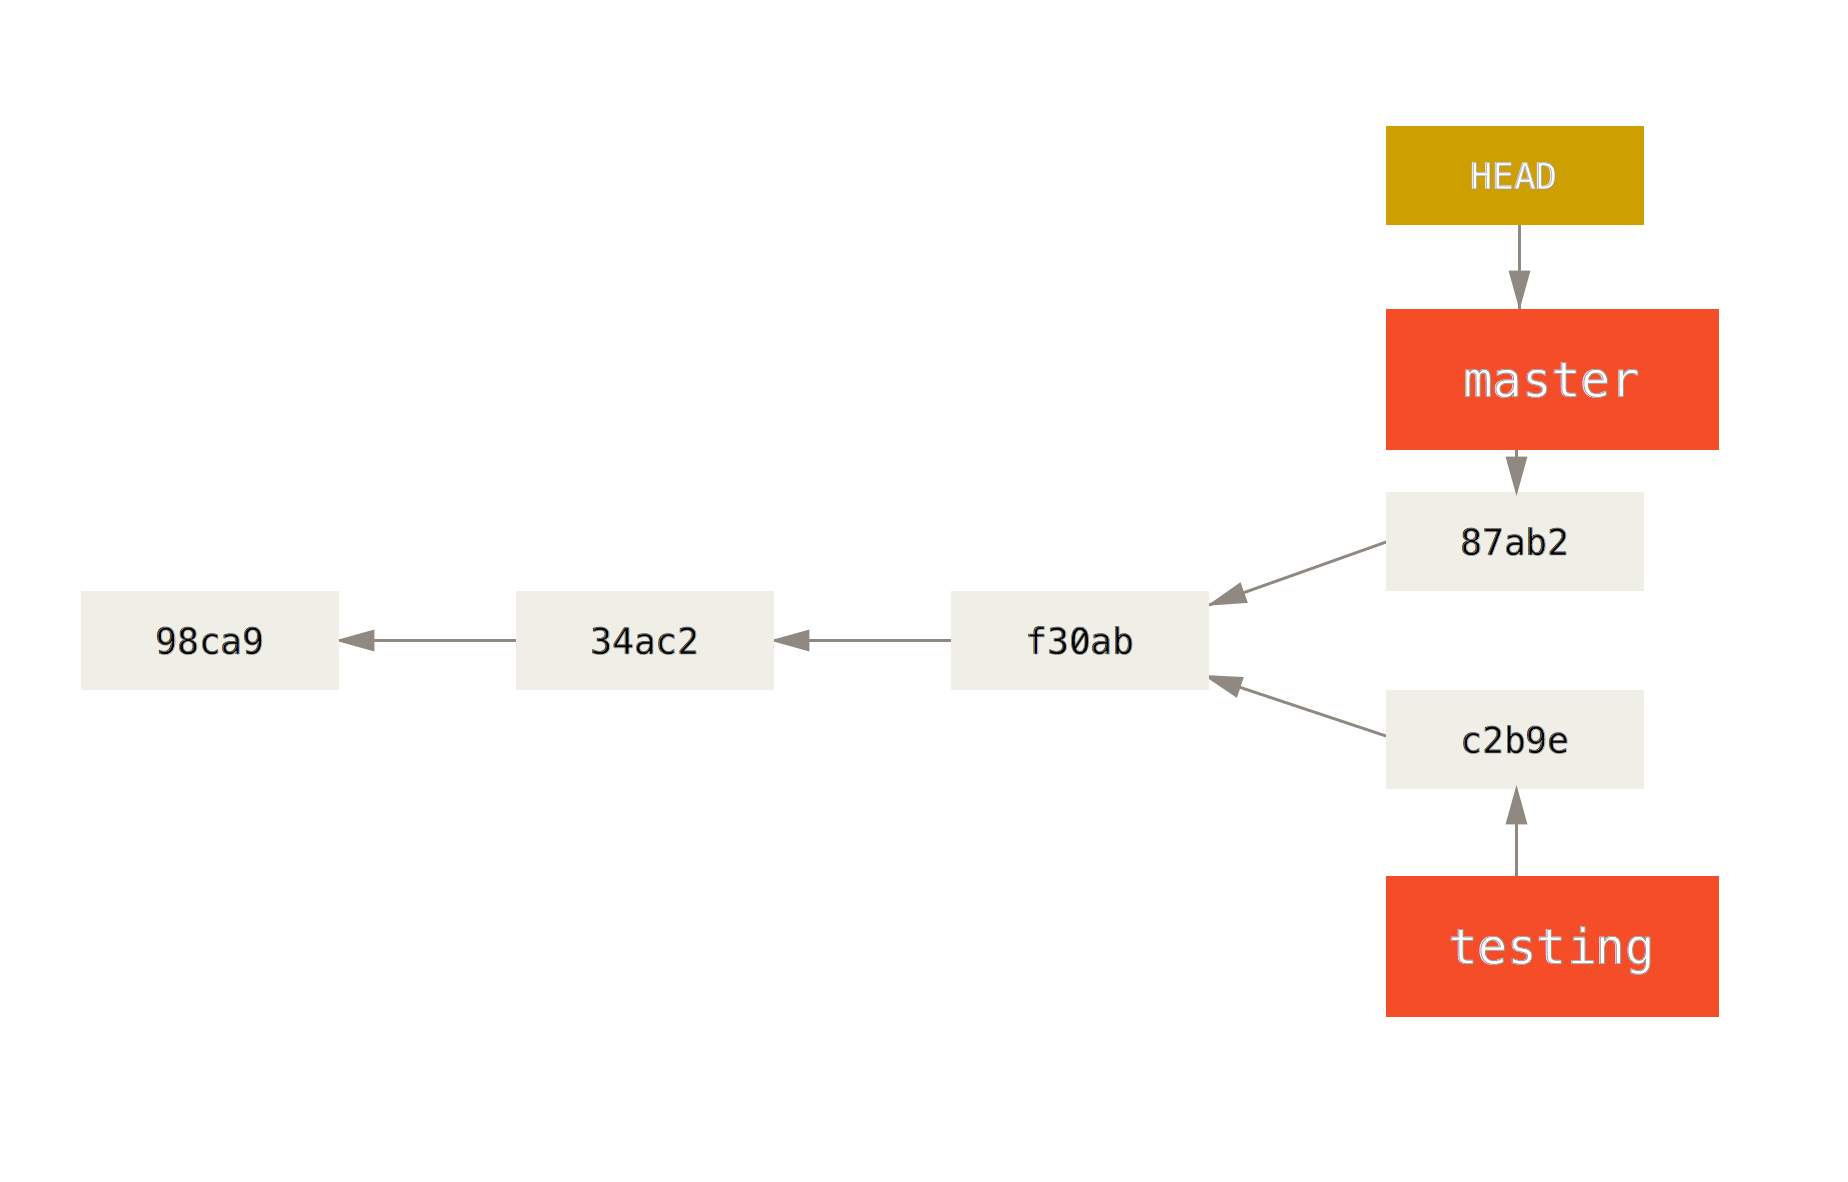
You can also see this easily with git log command:
$ git log --oneline --decorate --graph --all
Basic Merging
First, let’s say you’re working on your project and have a couple commits already.

You’ve decided that you’re going to work on issue #53 in whatever issue-tracking system your company uses. To create a branch and switch to it at the same time, you can run the git checkout command with the -b switch:
$ git checkout -b iss53
Switched to a new branch "iss53"
This is shorthand for:
$ git branch iss53
$ git checkout iss53
After fixing issue #53 and do some commits. Doing so moves the iss53 branch forward:
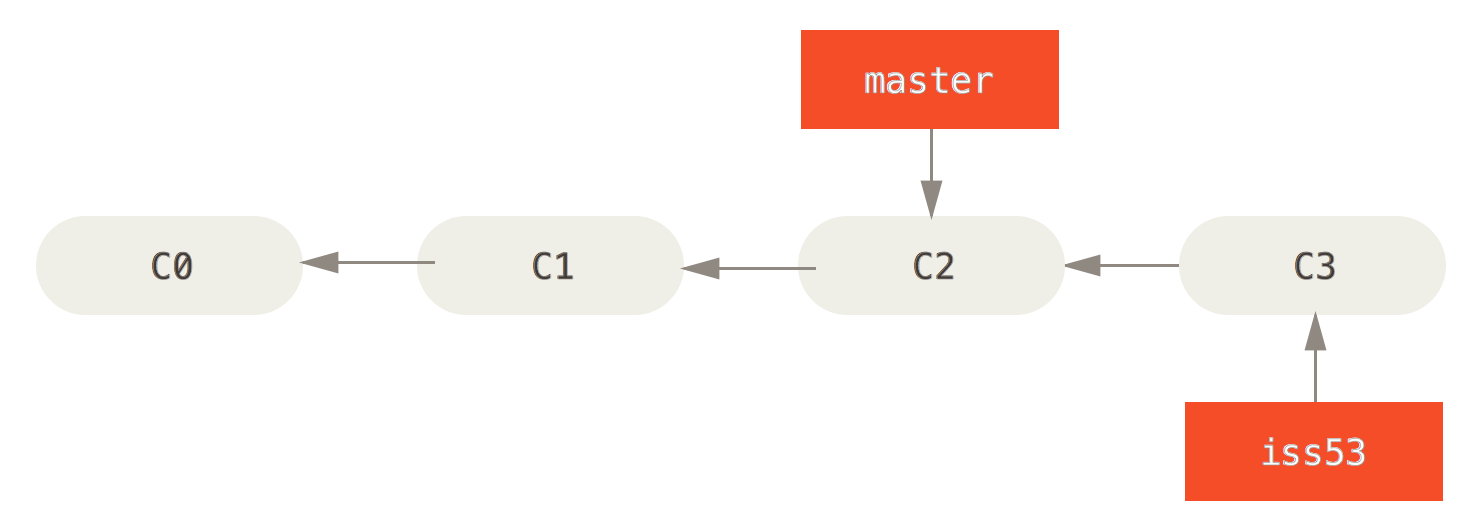
Now you get the call that there is a urgent issue, and you need to fix it immediately. With Git, you don’t have to deploy your fix along with the iss53 changes you’ve made, and you don’t have to put a lot of effort into reverting those changes before you can work on applying your fix to what is in production. All you have to do is switch back to your master branch and create a new hotfix branch:
$ git checkout master

$ git checkout -b hotfix
After the hotfix and do some commits:
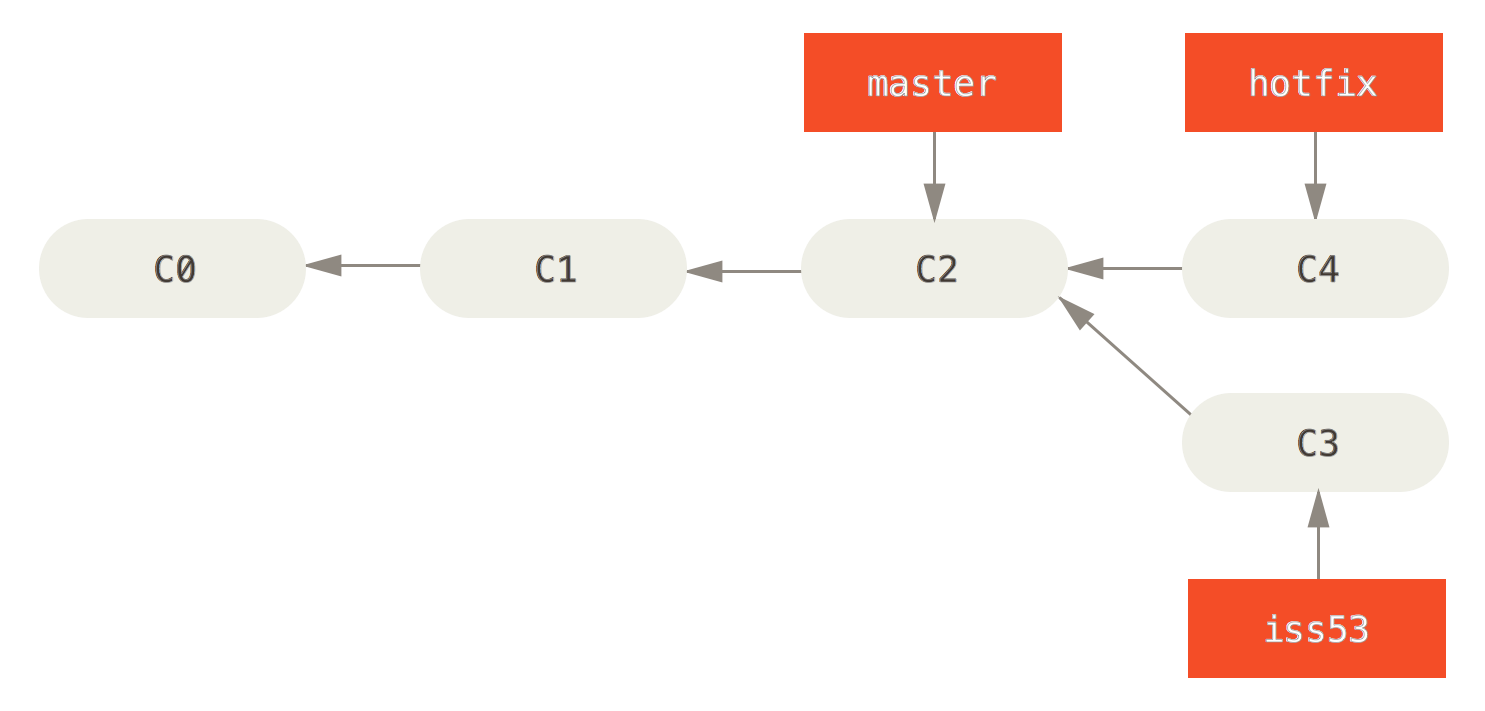
You can run your tests, make sure the hotfix is what you want, and merge it back into your master branch to deploy to production. You do this with the git merge command:
$ git checkout master

$ git merge hotfix
You’ll notice the phrase “fast-forward” in that merge. Because the commit C4 pointed to by the branch hotfix you merged in was directly ahead of the commit C2 you’re on, Git simply moves the pointer forward.
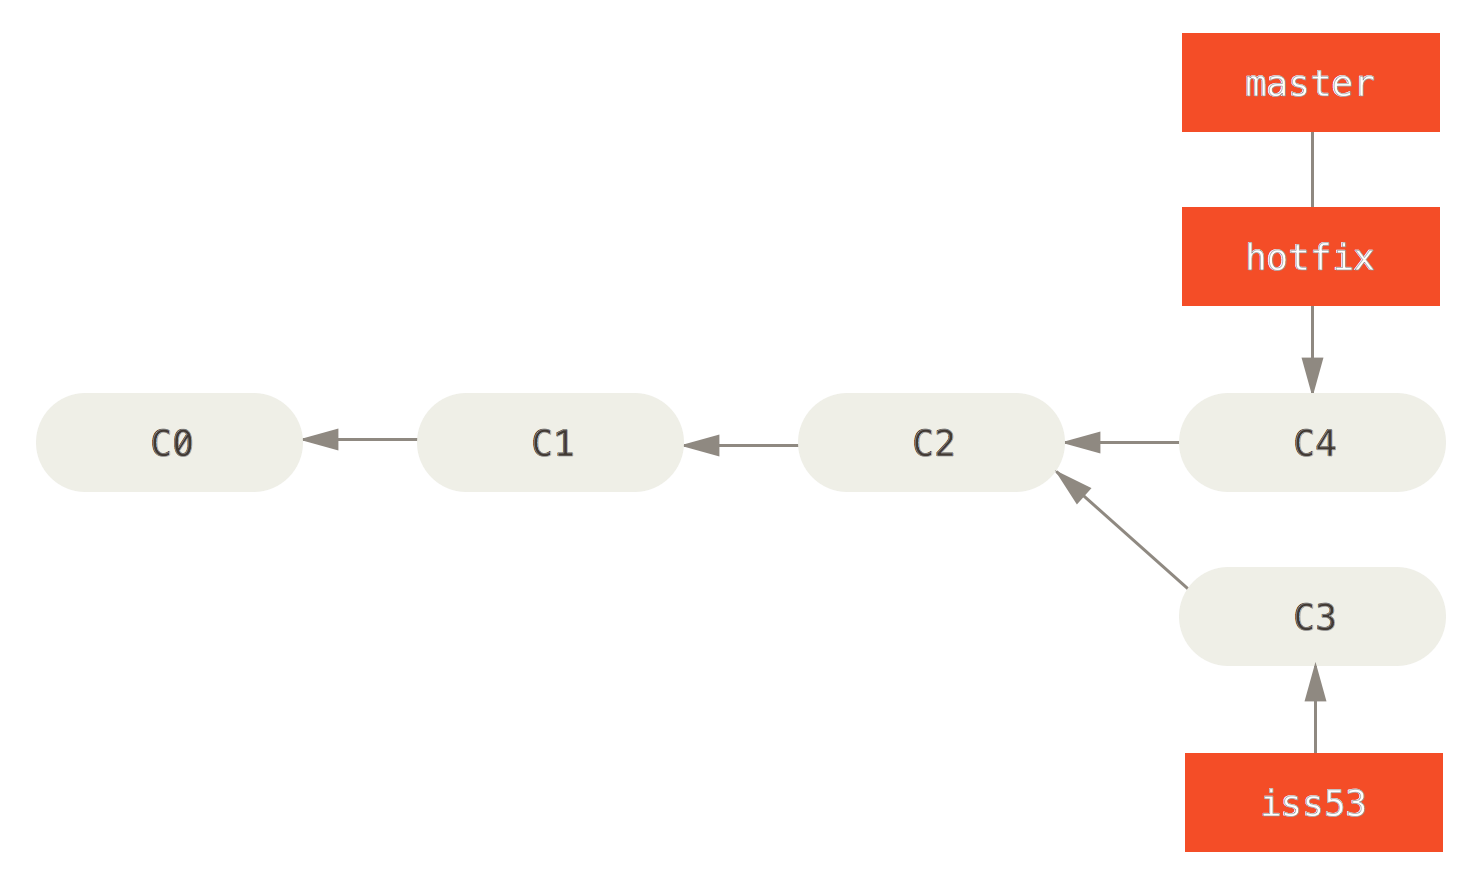
After your super-important fix is deployed, you’re ready to switch back to the work you were doing before you were interrupted. However, first you’ll delete the hotfix branch, because you no longer need it – the master branch points at the same place. You can delete it with the -d option to git branch:
$ git branch -d hotfix
If you want to delete a remote branch, use below command:
$ git push origin --delete <branch_name>
Now you can switch back to your work-in-progress branch on issue #53 and continue working on it.
$ git checkout iss53
After some subsequent changes and commits for issue #53:
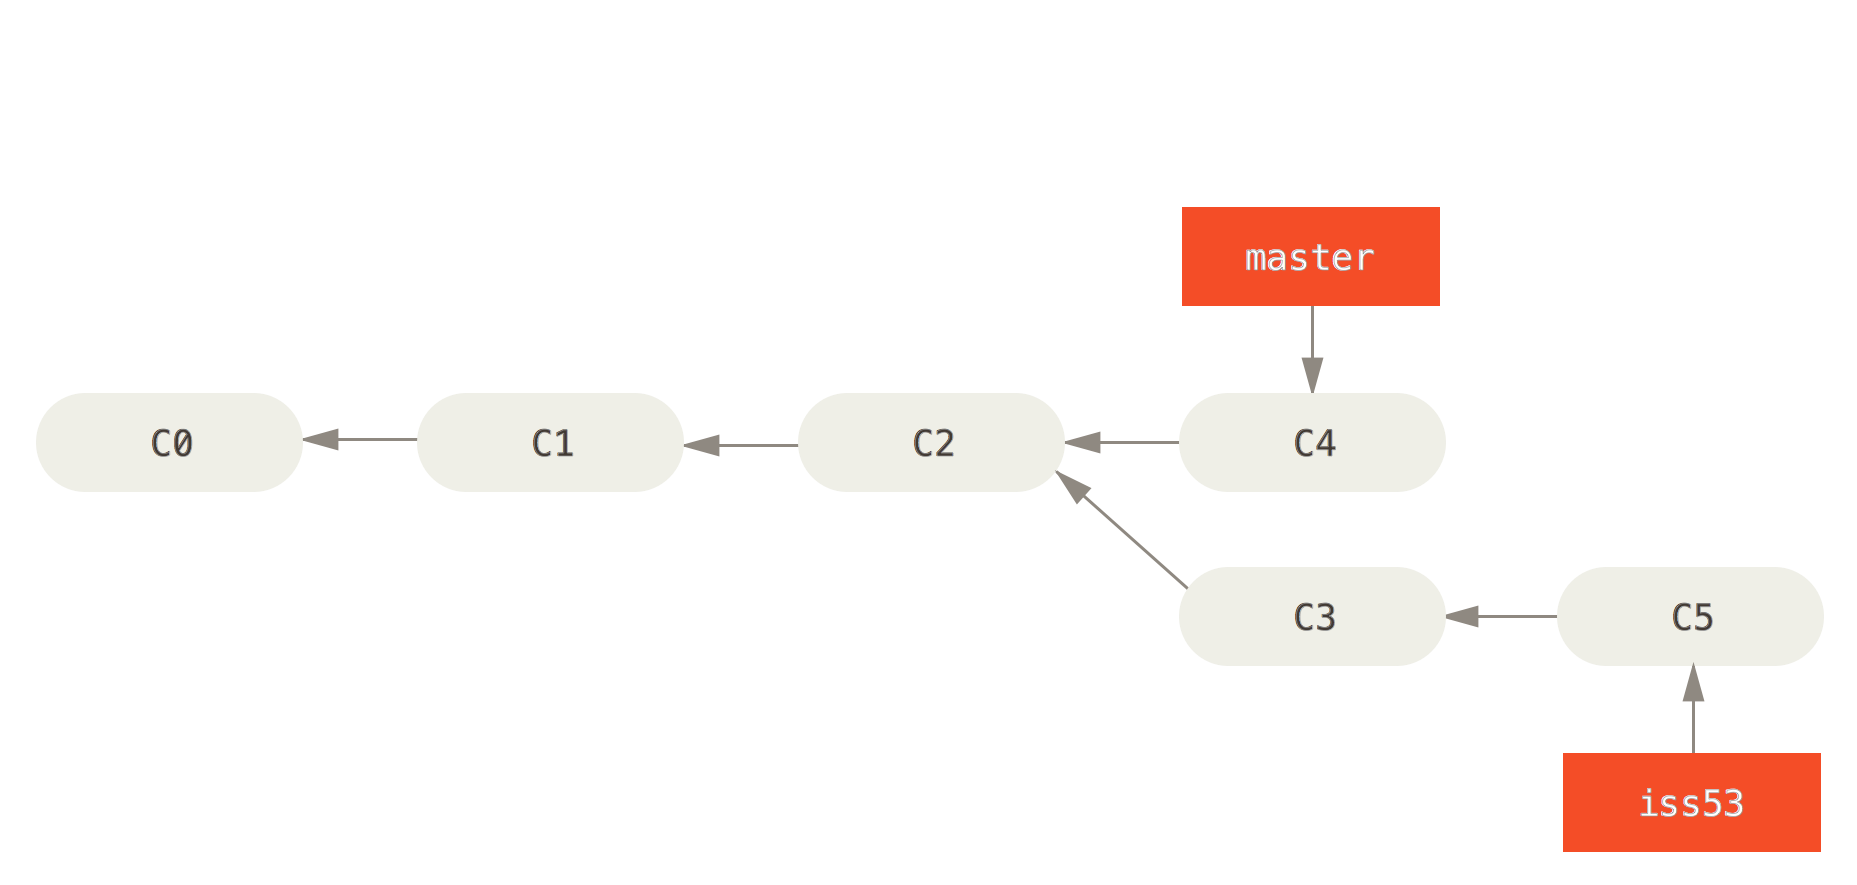
Suppose you’ve decided that your issue #53 work is complete and ready to be merged into your master branch. In order to do that, you’ll merge your iss53 branch into master, much like you merged your hotfix branch earlier. All you have to do is check out the branch you wish to merge into and then run the git merge command:
$ git checkout master

$ git merge iss53
This looks a bit different than the hotfix merge you did earlier. In this case, your development history has diverged from some older point. Because the commit on the branch you’re on isn’t a direct ancestor of the branch you’re merging in, Git has to do some work. In this case, Git does a simple three-way merge, using the two snapshots pointed to by the branch tips and the common ancestor of the two.
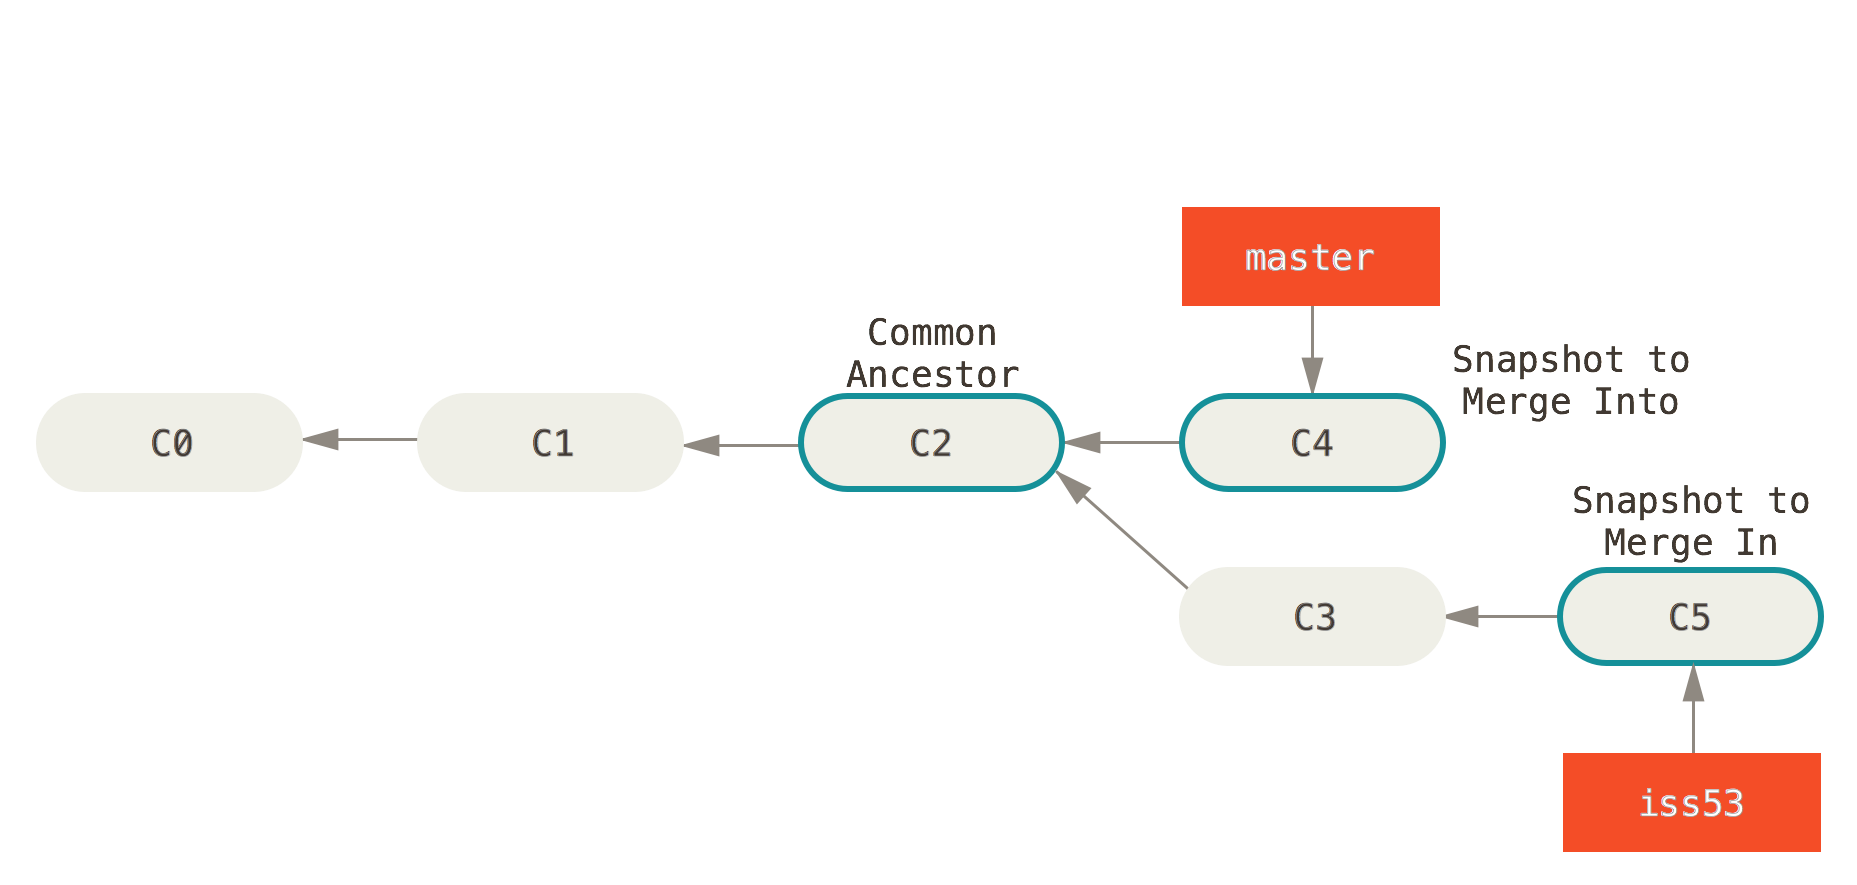
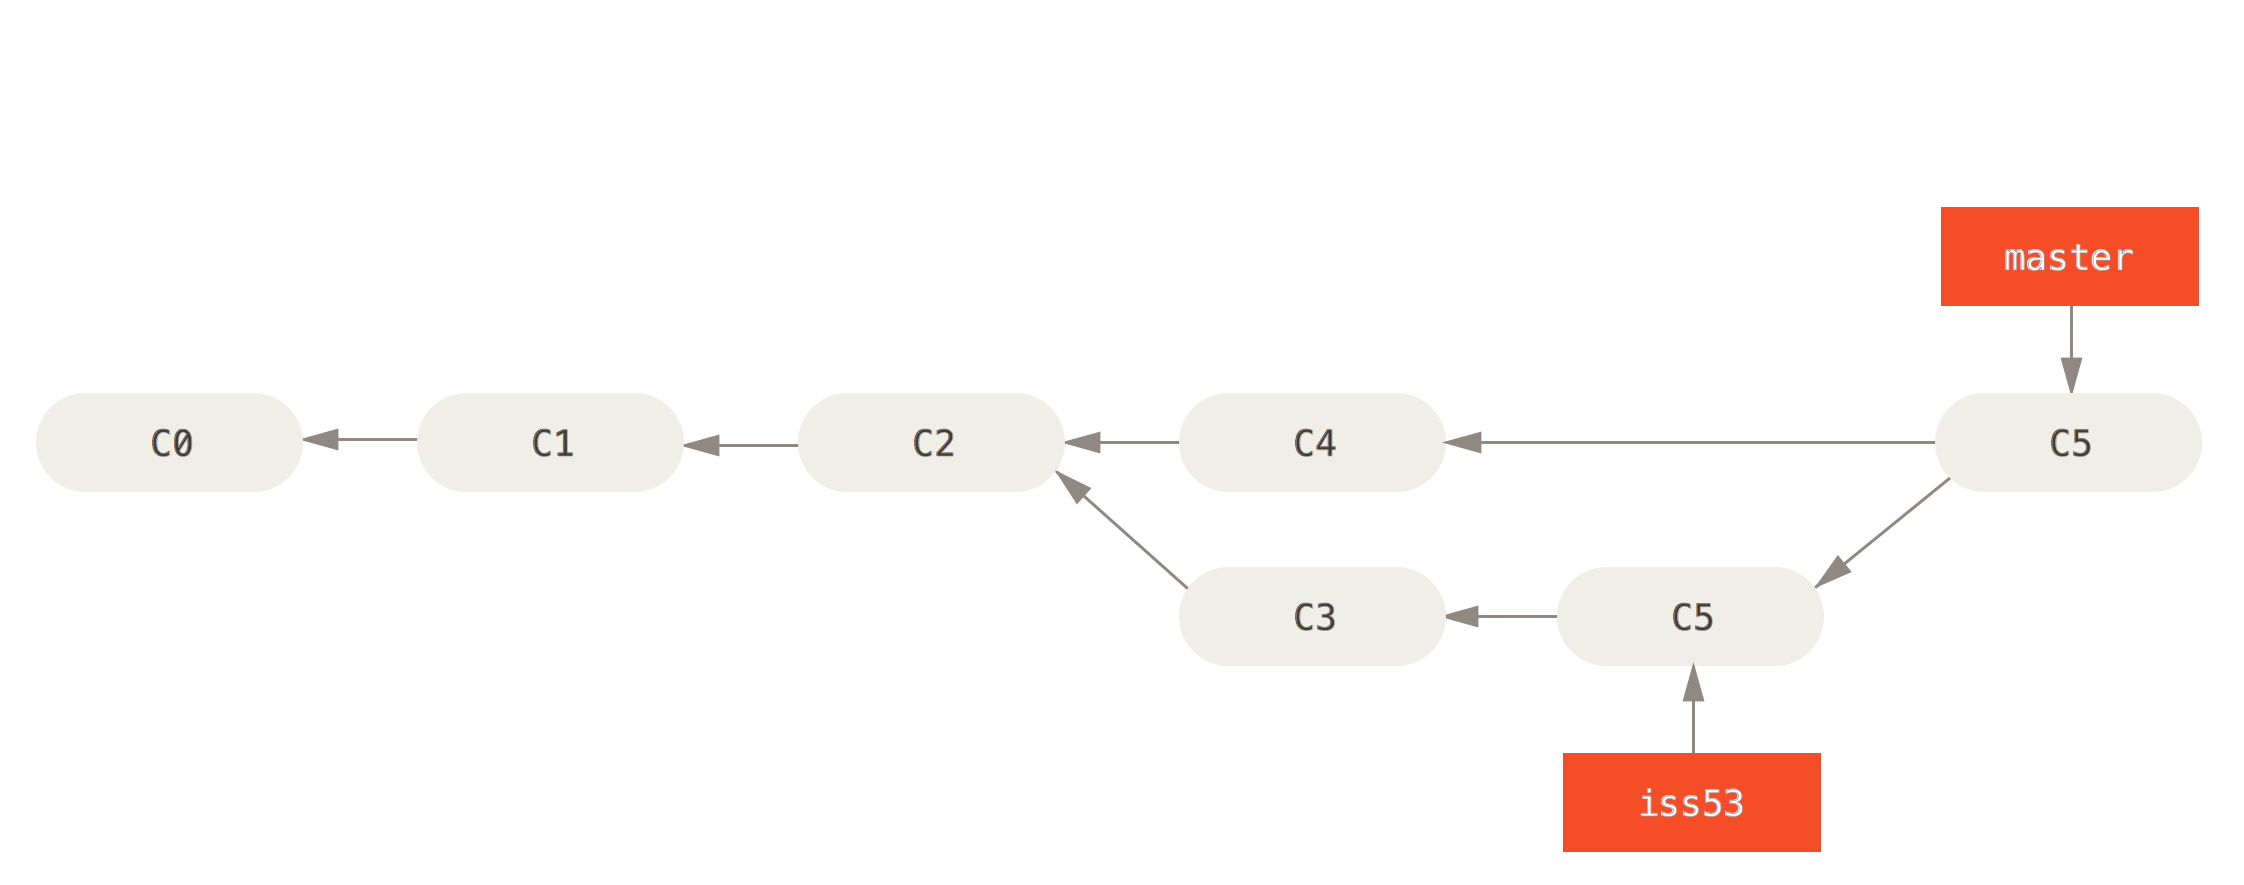
Instead of just moving the branch pointer forward, Git creates a new snapshot that results from this three-way merge and automatically creates a new commit that points to it. This is referred to as a merge commit, and is special in that it has more than one parent.
Branch Management
To show your current branches:
$ git branch
Branch name with a prefix * is the current branch you are on.
To see the last commit on each branch, you can run:
$ git branch -v
The useful --merged and --no-merged options can filter this list to branches that you have or have not yet merged into the branch you’re currently on. To see which branches are already merged into the branch you’re on, you can run git branch --merged, vice versa.
